Master Authentic Mango Sticky Rice Recipe at Home in Just One Hour
Stop buying mango sticky rice recipe from restaurants. Our foolproof mango sticky rice recipe delivers that exact creamy coconut taste and chewy rice texture at your kitchen table. Every step gets crystal clear instructions, exact ingredient sourcing links, and real troubleshooting that fixes every common mistake. Your guests will think you trained in Thailand.
Total Time 30 min
4 Servings
4.9★ Rating
What is Mango Sticky Rice?
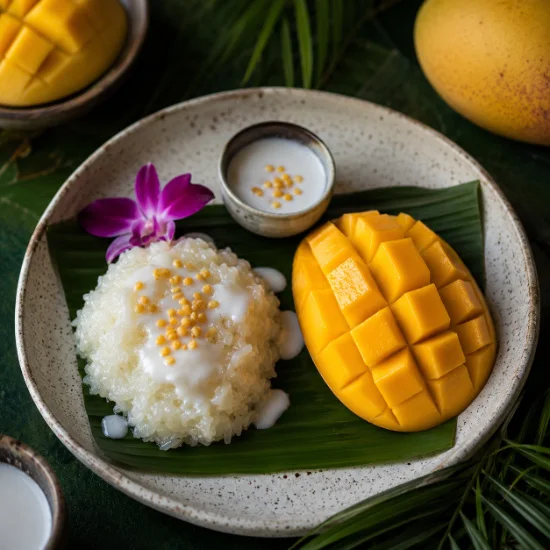
Mango sticky rice is Thailand’s most beloved dessert. This traditional Thai sweet combines three simple components into something extraordinary. You get ripe mangoes, glutinous rice and creamy coconut sauce working together perfectly. The dessert comes from Southeast Asia, specifically Thailand and the surrounding regions.
Your first taste reveals sweet mangoes against chewy sticky rice. The coconut cream coating brings everything together with rich aromatic flavor. This Asian dessert has become popular worldwide in Thai restaurants and home kitchens alike. The tropical fruit, sticky texture and aromatic coconut fragrance make it unforgettable.
Mango sticky rice recipe represents authentic Thai cuisine at its finest. The dessert delivers sweet flavor, creamy richness and that signature sticky texture people crave. You can make this traditional dessert at home without fancy equipment or difficult techniques. Visit mangostickyricerecipe.se to explore more Asian dessert recipes and variations.
Mango Sticky Rice Overview
Also Known As:
- Mango sweet sticky rice
- Thai mango sticky rice
- Thai sticky rice dessert
- Sweet sticky rice with mango
Category: Asian dessert, Thai dessert, Southeast Asian dessert, tropical dessert
Why People Love It: The appeal lies in perfect balance. Sweet mangoes meet chewy sticky rice. Creamy coconut sauce ties everything together. The combination delivers tropical fruit flavor with rich coconut creaminess and unique sticky texture. When you plate it properly, the dessert looks visually appealing with golden mango slices against white rice.
This dessert is perfect for summer meals or special occasions. The ingredients are accessible at most supermarkets and Asian grocery stores. The cooking process takes just one hour from start to finish. You get restaurant-quality results at home.
Key Ingredients Used in Mango Sticky Rice Recipe
Rice Base: Glutinous Rice Matters
You absolutely need glutinous rice for this recipe. Glutinous rice is also called sticky rice or sweet rice. This is not regular long-grain white rice. You are not using basmati rice or jasmine rice.
Why Glutinous Rice Works:
- High starch content creates chewy texture.
- Short grain structure expands during cooking.
- Amylose composition gives that signature sticky bite.
- Absorbs coconut sauce perfectly.
Rice Varieties That Work:
- Thai sticky rice
- Japanese mochigome (もち米)
- Thai sweet rice
- Sweet sticky rice varieties
Rice Types to Avoid:
- Regular long-grain white rice (too firm)
- Jasmine rice (aromatic but wrong texture)
- Basmati rice (separate grains, not creamy)
The starch content in glutinous rice differs completely from regular rice grains. When cooked, the opaque grains become translucent and creamy rather than separate. The chewy texture is what makes mango sticky rice recipe special. Jasmine rice is fragrant and delicious, but it will not deliver the correct bite.
Mango Component: Picking the Right Fruit
Fresh mangoes are essential. You want ripe mangoes with actual sweetness and flavor. Seasonal mangoes offer superior taste compared to off-season varieties. During mango season in spring and early summer, fresh ripe mangoes are at their best.
What to Look For:
- Ripe mangoes (sweet, fragrant)
- Fresh fruit rather than canned
- Golden color indicates ripeness
- Slight give when you apply gentle pressure
- Sweet tropical fragrance
Mango Varieties:
- Sweet mangoes work best
- Fresh ripe mangoes deliver superior flavor
- Whole mangoes give you ripeness control
- Slice mangoes properly for presentation
- Seasonal fruit offers better taste
What to Avoid:
- Sour mangoes (unpleasant taste)
- Green mangoes (too firm, not sweet)
- Canned mangoes (lack fresh flavor)
- Frozen mangoes (texture changes)
Fresh fruit creates the tropical flavor that defines this dessert. The mango sweetness combines perfectly with creamy coconut sauce. Avoid using canned mangoes or frozen mangoes when fresh options are available. Slice your mango vertically along the pit, then score the flesh in a crosshatch pattern.
Coconut Sauce: Building Creaminess and Flavor
Coconut milk is absolutely central to success. You must use full-fat coconut milk, not low-fat varieties. The full-fat unsweetened version creates the richness your dessert requires. Canned coconut milk works perfectly fine here.
Coconut Sauce Components:
- Full-fat coconut milk (the base)
- Coconut cream (optional, for extra richness)
- Granulated sugar or palm sugar
- Salt for balance
- Corn starch (optional, for thickening)
Sugar Options:
- Granulated sugar (standard choice)
- Palm sugar (authentic Thai flavor)
- Monk fruit extract (lower calorie)
- Stevia (sugar substitute)
Salt Choices:
- Table salt
- Kosher salt
- Sea salt
- Himalayan pink salt
The basic formula combines coconut milk with sugar and salt. Heat everything together until the sugar dissolves completely. The salt balances the sweetness and amplifies coconut flavor. Do not skip the salt step.
Some coconut sauce variations use corn starch for thickening. A slurry made from half teaspoon of corn starch and water creates thickened sauce. Your sweet coconut sauce should coat the rice without being too thick. The sauce consistency matters for proper absorption.
Measurements for Sauce:
- 1 cup coconut milk
- 6 tablespoon sugar
- Half teaspoon salt
- Water or corn starch (if thickening needed)
Heat your coconut mixture gently. Let the sugar dissolve completely. Cool slightly before combining with warm rice. The warm rice absorbs the coconut mixture better than cooled rice.
How to Make Mango Sticky Rice Recipe (Step-by-Step)
Step 1: Soak the Rice (1 to 2 hours or overnight)
Soaking glutinous rice is the first critical step. Place your glutinous rice in a large bowl. Cover completely with water. Let it sit for one to two hours minimum. Overnight soaking is even better if you have time.
Why Soaking Matters:
- Rice grains expand properly
- Softening process begins
- Chewy texture develops
- Cooking time decreases
The soaking process allows water absorption into the grains. The soaked rice becomes tender and ready for steaming. Skipping this step results in hard rice that resists enjoyment. The overnight soaking or one to two hours minimum makes all the difference.
Step 2: Prepare Your Steamer Setup
You have multiple options for steaming equipment. Choose whichever method suits your kitchen best.
Traditional Steamer Method:
- Woven basket (authentic choice)
- Mesh stainless steel steaming basket
- Cheesecloth wrapping
- Large pot filled with water
- Aluminum foil balls for support
- Metal plate or heat-resistant plate
- Tight-fitting lid
Setup Process:
- Fill a tall pot or deep pot with water
- Create supports using aluminum foil balls
- Place metal plate on the supports
- Water level should stay below your steaming surface
- This prevents water from touching your rice
Modern Alternatives:
- Rice cooker with steaming setting
- Instant Pot (pressure cooking)
- Fine-mesh strainer over boiling pot
Most home cooks use one of three methods. The traditional steamer preserves texture best. A rice cooker offers convenience and consistency. An Instant Pot speeds up the cooking time dramatically.
Step 3: Steam the Rice (15 to 30 minutes)
Wrap your soaked glutinous rice in cheesecloth before steaming. The cheesecloth wrapping holds grains together. It prevents water separation during the steam cooking process. Alternatively, aluminum foil serves the same purpose.
Place your wrapped rice on the steaming surface. Cover with a tight-fitting lid. Steam for fifteen to twenty minutes depending on the amount. You want soft, tender grains that maintain their chewy texture.
Steaming Timing:
- Small amounts: 15 minutes
- Medium portions: 20 minutes
- Large batches: 25 to 30 minutes
- Check at the 15-minute mark
The grains should soften completely but not become mushy. Overcooked rice becomes gluey rather than maintaining distinct sticky grains. Under-steamed rice stays hard and fails to soften. Heat control is critical for proper cooking.
Rice Cooker Method:
- Add soaked rice with measured water
- Engage steaming setting
- Rice cooker manages everything automatically
- Results are consistent every time
Instant Pot Method:
- Quick release pressure cooking
- Cooking time drops to 5 to 10 minutes
- Use high pressure setting
- Results in perfectly steamed rice
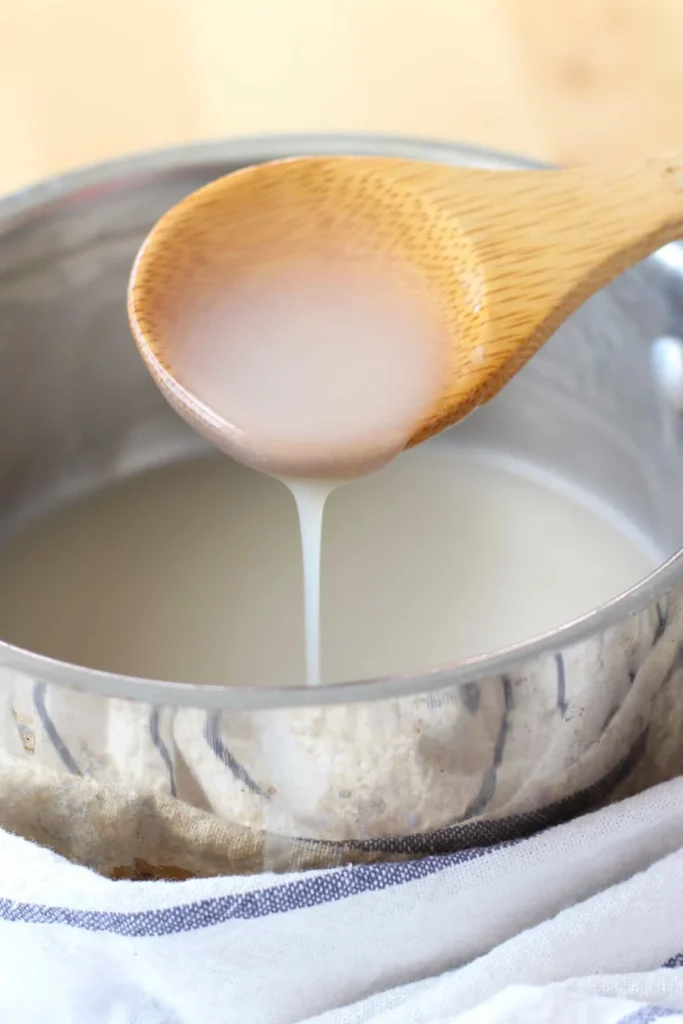
Step 4: Prepare Your Coconut Mixture
While your rice steams, prepare your coconut sauce. Heat your coconut milk in a saucepot over moderate heat. Add your sugar and salt together.
Coconut Mixture Steps:
- Pour coconut milk into a small saucepot
- Heat gently without boiling
- Add granulated sugar to the hot coconut milk
- Stir until sugar dissolves completely
- Add salt and stir thoroughly
- Remove from heat and let cool slightly
The heat process combines coconut milk, sugar, and salt into a cohesive coconut sauce. Do not skip the salt. The salt balances the sweetness and prevents the sauce from tasting one-dimensional. Your sweet coconut sauce mixture should cool before combining with warm rice.
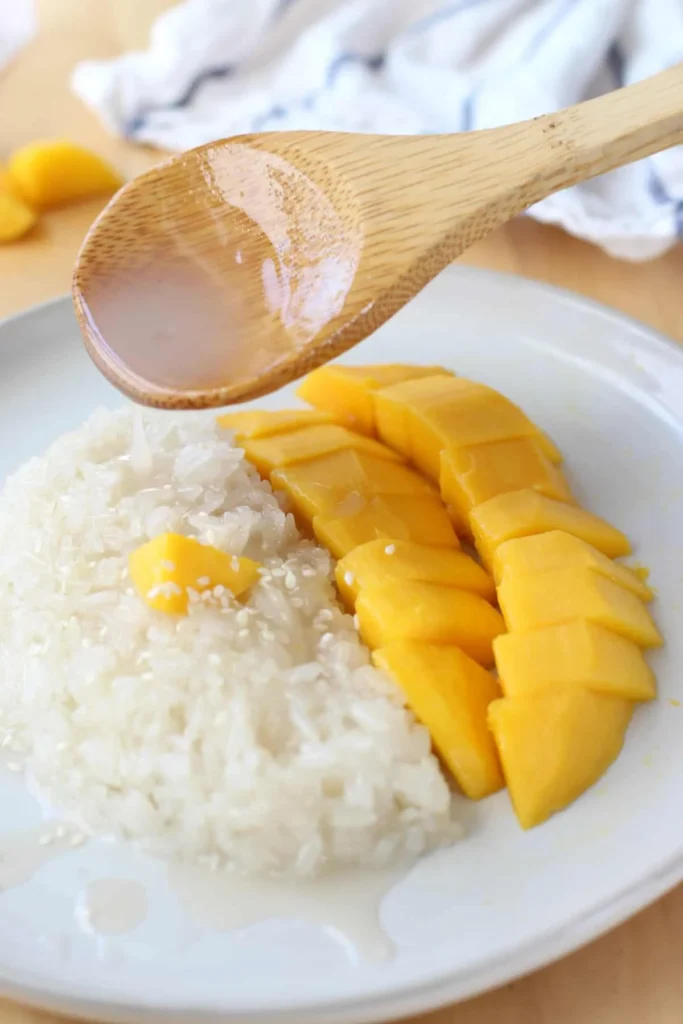
Step 5: Combine Rice and Coconut Mixture
Once your rice finishes steaming, transfer it to a large bowl. Your steamed rice should feel warm and tender. Pour your prepared coconut mixture over the warm glutinous rice. Combine everything thoroughly using a spoon.
Combining Process:
- Transfer warm steamed rice to a large bowl
- Pour warm coconut sauce over the rice
- Mix thoroughly with a spoon
- Fold gently to avoid breaking grains
- Let rest for 5 to 10 minutes
The warm rice absorbs the coconut liquid throughout the mixture. The absorption process happens as the rice steams gently during this resting period. Cover your bowl with a lid during rest. This traps moisture and ensures even absorption.
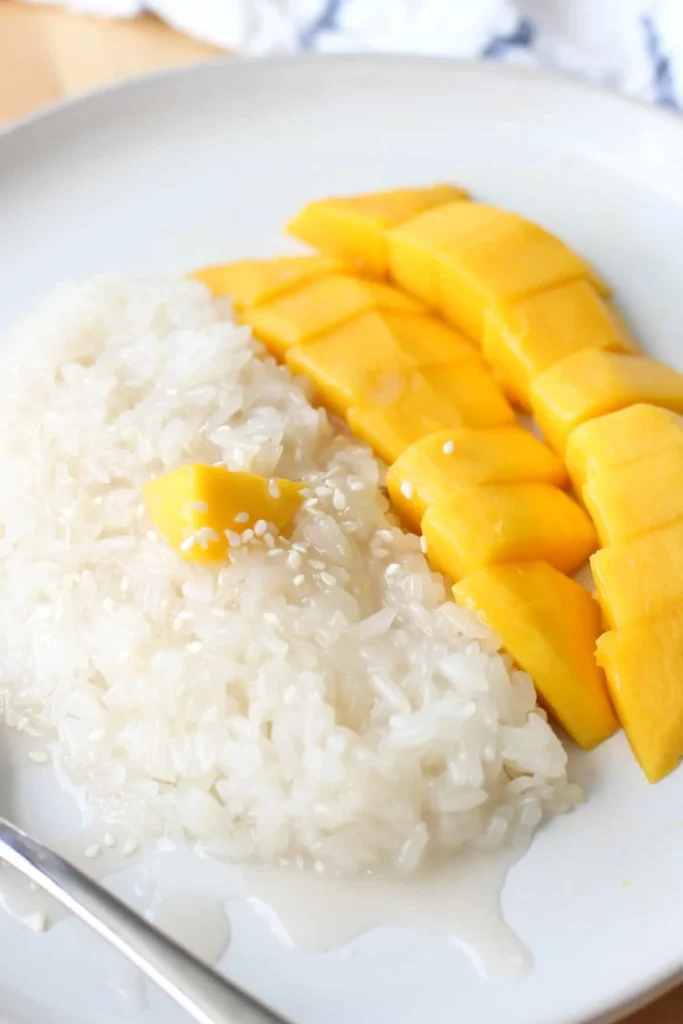
Step 6: Prepare Your Mangoes
Slice your ripe mangoes into thin, attractive pieces. The presentation matters here. Arrange mango slices on your serving plate or microwave-safe serving dish.
Mango Preparation:
- Choose ripe, fresh mangoes
- Slice vertically along the pit
- Score the flesh in a crosshatch pattern
- Scoop with a spoon or peel the skin
- Arrange slices on your serving plate
The mango slices should look visually appealing. Golden color and uniform thickness create restaurant-quality presentation. Take time with this step. Your plating choices transform homemade dessert into something special.
Step 7: Final Assembly and Plating
Place your warm sticky rice beside the mango slices. The warm mixture should rest against the fruit at room temperature or slightly warm. Some people prefer warm rice with chilled mango. Others warm everything together. Test your preference.
Plating Steps:
- Arrange mango slices on serving plate
- Place generous portion of coconut rice beside mango
- Drizzle remaining coconut sauce artistically
- Add sesame seeds or mung bean garnish
- Serve immediately
The final presentation should make guests pause before eating. The golden mango slices, white sticky rice, golden coconut sauce, and sesame garnish create visual appeal. A beautiful plating elevates the entire experience.
Cooking Methods and Tools
Traditional Steamer Method
This method uses basic kitchen equipment. A woven basket acts as your steaming vessel. Fill a large pot with water. Create supports using aluminum foil balls. Place a heat-resistant plate on top. Your wrapped rice rests on this plate.
The steam rises from boiling water below without touching your rice directly. This gentle heat control creates superior texture. Your rice grains stay distinct and creamy rather than becoming waterlogged. The tight-fitting lid traps steam inside.
Advantages:
- Best texture results
- No special equipment needed
- Traditional method proven for centuries
- Preserves chewy bite
Disadvantages:
- Requires more setup time
- Need to monitor water level
- Takes slightly longer overall
Rice Cooker Method
A rice cooker with steaming function simplifies everything. Add your soaked glutinous rice with measured water. Engage the steaming setting. The rice cooker manages heat automatically.
Your rice turns out consistent every time. The guesswork disappears. Modern rice cookers have sensors that prevent burn-on issues. You can walk away while it cooks.
Advantages:
- Extremely convenient
- Consistent results
- Automatic heat control
- Frees up your stove
Disadvantages:
- Requires rice cooker ownership
- Less hands-on experience
- May not fit larger batches
Instant Pot Method
An Instant Pot uses pressure cooking to accelerate the process. Add soaked rice with the correct water ratio. Seal the lid. Set high pressure for five to ten minutes.
The pressure cooking method cooks sticky rice faster than traditional steaming. Most Instant Pot models have steaming settings designed specifically for glutinous rice. The cooking time drops dramatically compared to traditional methods.
Advantages:
- Fastest cooking method
- Highly reliable results
- Great for meal prep
- Saves significant time
Disadvantages:
- Requires Instant Pot ownership
- Less traditional approach
- Smaller batch capacity
Improvised Steamer Setup
You can create a makeshift steamer without specialized equipment. Use an inverted basket or heat-resistant plate. Aluminum foil balls create supports. A pasta-boiling pot and fine-mesh strainer work together.
Place your wrapped rice in the strainer. Let steam rise from boiling water below. Cover with a tight-fitting lid. This approach works perfectly fine if you lack specialized kitchen equipment.
Direct Boiling Method
Some people choose to boil glutinous rice rather than steam it. Bring soaked rice to a boil with measured water. Simmer until tender. Drain excess water carefully. This method takes longer and produces acceptable results.
The boiling process is more hands-off than steaming. However, texture sometimes suffers from excess water absorption. Traditional steaming beats modern shortcuts for preserving that signature chewy bite.
Tips for Perfect Mango Sticky Rice Recipe
Choosing Ripe Mangoes: Your mango selection makes or breaks the dessert. Look for mangoes that yield slightly to gentle pressure. The skin should have a golden hue without brown spots. Fresh ripe mangoes smell sweet and tropical. Seasonal mangoes taste superior to off-season shipped fruit.
Best Rice Types: Glutinous rice is non-negotiable for proper texture. Thai sticky rice and Japanese mochigome both work beautifully. The high starch content creates that signature chewy bite. Do not substitute jasmine rice or regular long-grain varieties.
Avoiding Mushy or Hard Rice: Soaking time directly affects texture outcomes. Skip soaking and rice stays hard. Overcook during steaming and rice becomes mushy. Proper soaking of one to two hours improves results dramatically. Monitor steaming time carefully.
Coconut Sauce Consistency Control: Your sauce should coat the rice without being thick. If sauce seems too thin, add corn starch mixed with water. Heat gently while stirring. The sauce thickens as it cools slightly. Test the thickness before combining with rice.
Flavor Enhancement Tips: Salt amplifies all other flavors. Do not skip this ingredient. Some people add vanilla extract or almond extract for subtle complexity. A pinch of cardamom adds aromatic interest. These additions should enhance rather than dominate.
Timing Your Components: Prepare coconut sauce while rice steams. This timing ensures everything comes together warm. Slice mangoes just before serving for optimal freshness. Assembly happens last so nothing sits around.
Storage and Freshness: Store rice and mango separately in the refrigerator. Combined storage causes mango to soften and lose flavor. Keep components in airtight containers for up to five days. Assemble fresh right before serving.
Variations of Mango Sticky Rice
Vegan Version
Replace coconut milk with plant-based coconut cream alternatives. Many vegan coconut products work as direct substitutes. The coconut flavor profile remains authentic. Everything else stays exactly the same.
Gluten-Free Version
Good news: traditional mango sticky rice is naturally gluten-free. Glutinous rice contains no gluten despite the confusing name. All traditional ingredients remain gluten-free. People following strict gluten-free diets enjoy this dessert confidently.
Low-Sugar or Healthy Alternatives
Substitute granulated sugar with monk fruit extract or stevia. The sweetness level remains satisfying without traditional sugar. Coconut cream-rich versions amplify coconut flavor by increasing proportions. These adaptations let you customize to your preferences.
Coconut Cream-Rich Version
Increase the coconut cream component for extra richness. Some recipes use equal parts coconut milk and coconut cream. This variation delivers intense coconut flavor and luxurious texture. The sweetness might need slight reduction.
Regional Thai Variations
Northeastern India and Bhutan have their own interpretations. Northern Thai versions sometimes include jasmine for fragrance. Some areas incorporate cardamom or other aromatic spices. These variations prove the dessert transcends strict traditional boundaries.
Flavor Enhancement Variations
Add small amounts of vanilla extract or almond extract. A dash of rum adds subtle complexity. Different mango varieties create flavor combinations. Rose water in the coconut sauce offers floral notes. Experiment with ingredients you enjoy.
Storage and Reheating Guide
How to Store Mango Sticky Rice
Transfer leftover rice to an airtight container immediately after serving. Proper food storage in the refrigerator extends freshness to five days. The coconut sauce and rice together preserve better than separate storage. Keep mango slices in a separate airtight container.
Storage Method:
- Cool rice to room temperature
- Transfer to airtight container
- Refrigerate immediately
- Store mango separately
- Label with date for reference
Storing Components Separately
Mango slices should never sit with warm coconut rice. Fresh mango absorbs flavors and softens. Keeping components separate preserves individual textures and brightness. You can reassemble your dessert with freshness intact.
Reheating Your Leftovers
Remove your leftover storage container from the refrigerator. Transfer sticky rice to a microwave-safe serving dish. Drizzle a small amount of water across the top. This water drizzle prevents drying during reheating.
Reheating Process:
- Transfer to microwave-safe dish
- Add water drizzle
- Heat on moderate setting for 1 to 2 minutes
- Check that warmed through completely
- Add fresh mango before serving
The warmed mixture should feel warm enough to enjoy but not scorching hot. You can also reheat using a small saucepot on the stovetop. Add a tablespoon of coconut milk or water. Heat gently over low heat. Stir occasionally for even warming.
Maintaining Rice Quality
The key to maintaining rice quality is preventing moisture loss. Airtight storage and proper reheating with water additions keep leftover rice tasting nearly fresh. Some people prepare mango sticky rice as meal prep. They enjoy portions throughout the week.
Meal Prep Advantages
Prepare rice component three to four days ahead. Refrigerate in airtight containers. Slice fresh mangoes just before eating. This approach saves time while maintaining quality. Perfect for busy schedules or meal planning.
Nutrition Information
Calories and Macronutrients
Most mango sticky rice recipe contain approximately three hundred to four hundred calories per serving depending on portion sizes. Carbohydrates from sticky rice comprise the largest macronutrient component. Fat comes primarily from coconut milk, with saturated fat comprising most fat content.
Approximate Nutrition Per Serving:
- Calories: 300-400 kcal
- Carbohydrates: 50-60 grams
- Fat: 10-15 grams
- Saturated fat: 8-12 grams
- Protein: 2-3 grams
Vitamin and Mineral Content
Vitamin A comes from mango and coconut components. Vitamin C concentrations appear higher in fresh mango. Calcium, iron, and other minerals distribute throughout all ingredients. Magnesium from coconut milk supports various body functions. Potassium from mango provides mineral balance.
Key Nutrients:
- Vitamin A (from mango)
- Vitamin C (from mango)
- Calcium
- Iron
- Magnesium
- Potassium
- Fiber
Dietary Considerations
Sodium content depends on how much salt you add to the coconut sauce. Half teaspoon of salt creates modest sodium levels. Fiber from mango and rice supports digestive health. Gluten-free status requires no modifications since glutinous rice contains no gluten. Vegan versions eliminate all animal products without sacrificing flavor.
Healthy Adaptations
Lower sugar versions use monk fruit extract or stevia. Calorie options vary based on portion sizes and ingredient amounts. Nutrition information provides approximation for typical servings. Your specific macronutrient totals depend on actual portion sizes and specific brands used.
Common Mistakes to Avoid
Using Wrong Rice Type
This ranks as the most common error. Regular long-grain white rice never delivers sticky texture. Jasmine rice is fragrant but remains too firm. Basmati rice creates completely different texture expectations. You absolutely must use glutinous rice.
Skipping the Soaking Step
The overnight soaking or one to two hours minimum allows proper grain expansion. Rushing straight to steaming skips crucial texture development. The soaking process seems optional but actually transforms your final result completely. Never skip this step.
Overcooking or Under-Steaming
Overcooked rice becomes gluey rather than chewy. Under-steamed rice stays hard and fails to soften. Timing varies based on your setup and rice amount. Start checking at the fifteen-minute mark and adjust from there. Proper timing is critical.
Incorrect Coconut Sauce Ratio
Too much sugar overwhelms the mango and rice flavors. Too little salt fails to balance sweetness. An incorrect coconut to rice ratio means some rice tastes plain. Follow basic proportions and adjust to your taste preferences.
Not Cooling Mango Slices Separately
Warm coconut mixture softens fresh mango if they sit together for hours. The fruit absorbs flavors and loses brightness. Keep components separate during storage. Assemble just before serving for optimal texture contrast.
Forgetting About Salt
Salt amplifies all other flavors and prevents one-dimensional taste. Do not skip this ingredient even in small amounts. The salt balances sweetness and brings all elements into harmony. This is a critical component.
Using Low-Fat Coconut Milk
Full-fat coconut milk creates the richness this dessert demands. Low-fat varieties lack creamy texture and flavor depth. The coconut taste becomes muted and disappointing. Always choose full-fat unsweetened versions.
Frequently Asked Questions About Mango Sticky Rice Recipe
Can I use jasmine rice instead of sticky rice? No, jasmine rice creates firm, separate grains instead of the creamy chewy texture this dessert requires. Glutinous rice is essential.
Why is my sticky rice hard? You likely skipped the soaking step or under-steamed the rice. Soak for at least one to two hours minimum before steaming.
Can I make it ahead of time? Yes, prepare components separately up to five days ahead. Store in airtight containers in your refrigerator.
What mango is best for this recipe? Ripe sweet mangoes work best. Avoid sour or green mangoes. Seasonal fresh mangoes offer superior flavor.
Is it gluten-free? Yes, mango sticky rice is naturally gluten-free. Glutinous rice contains no gluten despite the confusing name.
Can I use canned mangoes? Canned mangoes work in emergencies but lack the fresh fruit flavor. Fresh ripe mangoes deliver superior results.
How long does it stay fresh? Proper storage in an airtight container extends freshness to five days in your refrigerator.
Can I freeze mango sticky rice? Freezing is not recommended. The rice texture changes dramatically after thawing. Fresh or refrigerated storage produces better results.
What if I cannot find glutinous rice? Keep searching local Asian grocery stores or online retailers. Amazon and specialty shops ensure access to glutinous rice.
Can I make this vegan? Yes, use coconut cream or other plant-based coconut products. The dessert remains authentic and delicious with these substitutions.
Time to Cook
Creating authentic mango sticky rice at home proves easier than you might expect. The ingredient list is short. The techniques are straightforward. The results rival professional restaurants when you pay attention to details.
Start with quality glutinous rice from trusted sources. Seek out local Asian grocery stores or reliable online retailers. Fresh ripe mangoes make the biggest flavor difference. Full-fat unsweetened canned coconut milk delivers consistent results.
Your cooking setup matters less than your attention to process. Traditional steaming creates the best texture. Rice cookers and Instant Pots work fine if you prefer convenience. Timing your soaking properly makes rice texture superior. Combining warm rice with coconut sauce ensures proper absorption.
The assembly step is where you create visual appeal. Your plating choices transform homemade dessert into something special. Proper garnish with sesame seeds or mung beans completes the experience.
Every component matters in mango sticky rice preparation. The rice foundation, mango fruit selection, coconut sauce balance, steaming execution, and final assembly all contribute to your finished dessert. Master each step and you create something truly special.
Your guests will assume you spent hours preparing this dessert. The secret is that quality ingredients and proper technique create impressive results without excessive complexity. You are not just serving dessert. You are delivering an authentic taste of Thai cuisine and Southeast Asian tradition.
For more mango sticky rice variations and flavor combinations, visit mangostickyricerecipe.se today. Explore additional Asian dessert recipes and connect with our community of home cooks who share ingredient sourcing tips, troubleshooting solutions, and personalized variations. Transform simple tropical fruit and pantry staples into something that tastes like pure indulgence.